Just in time for Halloween I have a cute cookie recipe! Each year my kids always want me to make some yummy treat to send to school for Halloween. …
Black Cat Cookies – Scarily Cute
Nov13
Just in time for Halloween I have a cute cookie recipe! Each year my kids always want me to make some yummy treat to send to school for Halloween. …
Black Cat Cookies – Scarily Cute


Traditionally gardening is done in rows, and is what my parents always did. So last year that is what I followed. I had started reading a bit about square foot gardening, so decided this year that I would give it a try. Now, I’m not claiming to be an expert, but here is what I have learned, and done so far.
The basic idea behind square foot gardening, is to try to plant more efficiently in a smaller space. Depending on what you are growing, it is anywhere from one plant, to sixteen per square foot. As well, by planting in a more compact space there should be less weeds among the area planted.
To lay out your square foot garden you will plan 4 foot by 4 foot plots (16 square feet), then three feet between plots. You can also do these as raised garden beds or as I have done right in my garden, and just marked off with wood stakes and twine.

If doing raised beds, make sure to fill beds with enough good quality soil and compost for nutrients. Between you can have grass, or other mulch. You can even have permanent paths using cement blocks, bricks or stone.
Before measuring out my plots the garden was tilled, by my husband. There was a layer of straw mulch from last year that was worked into the ground.
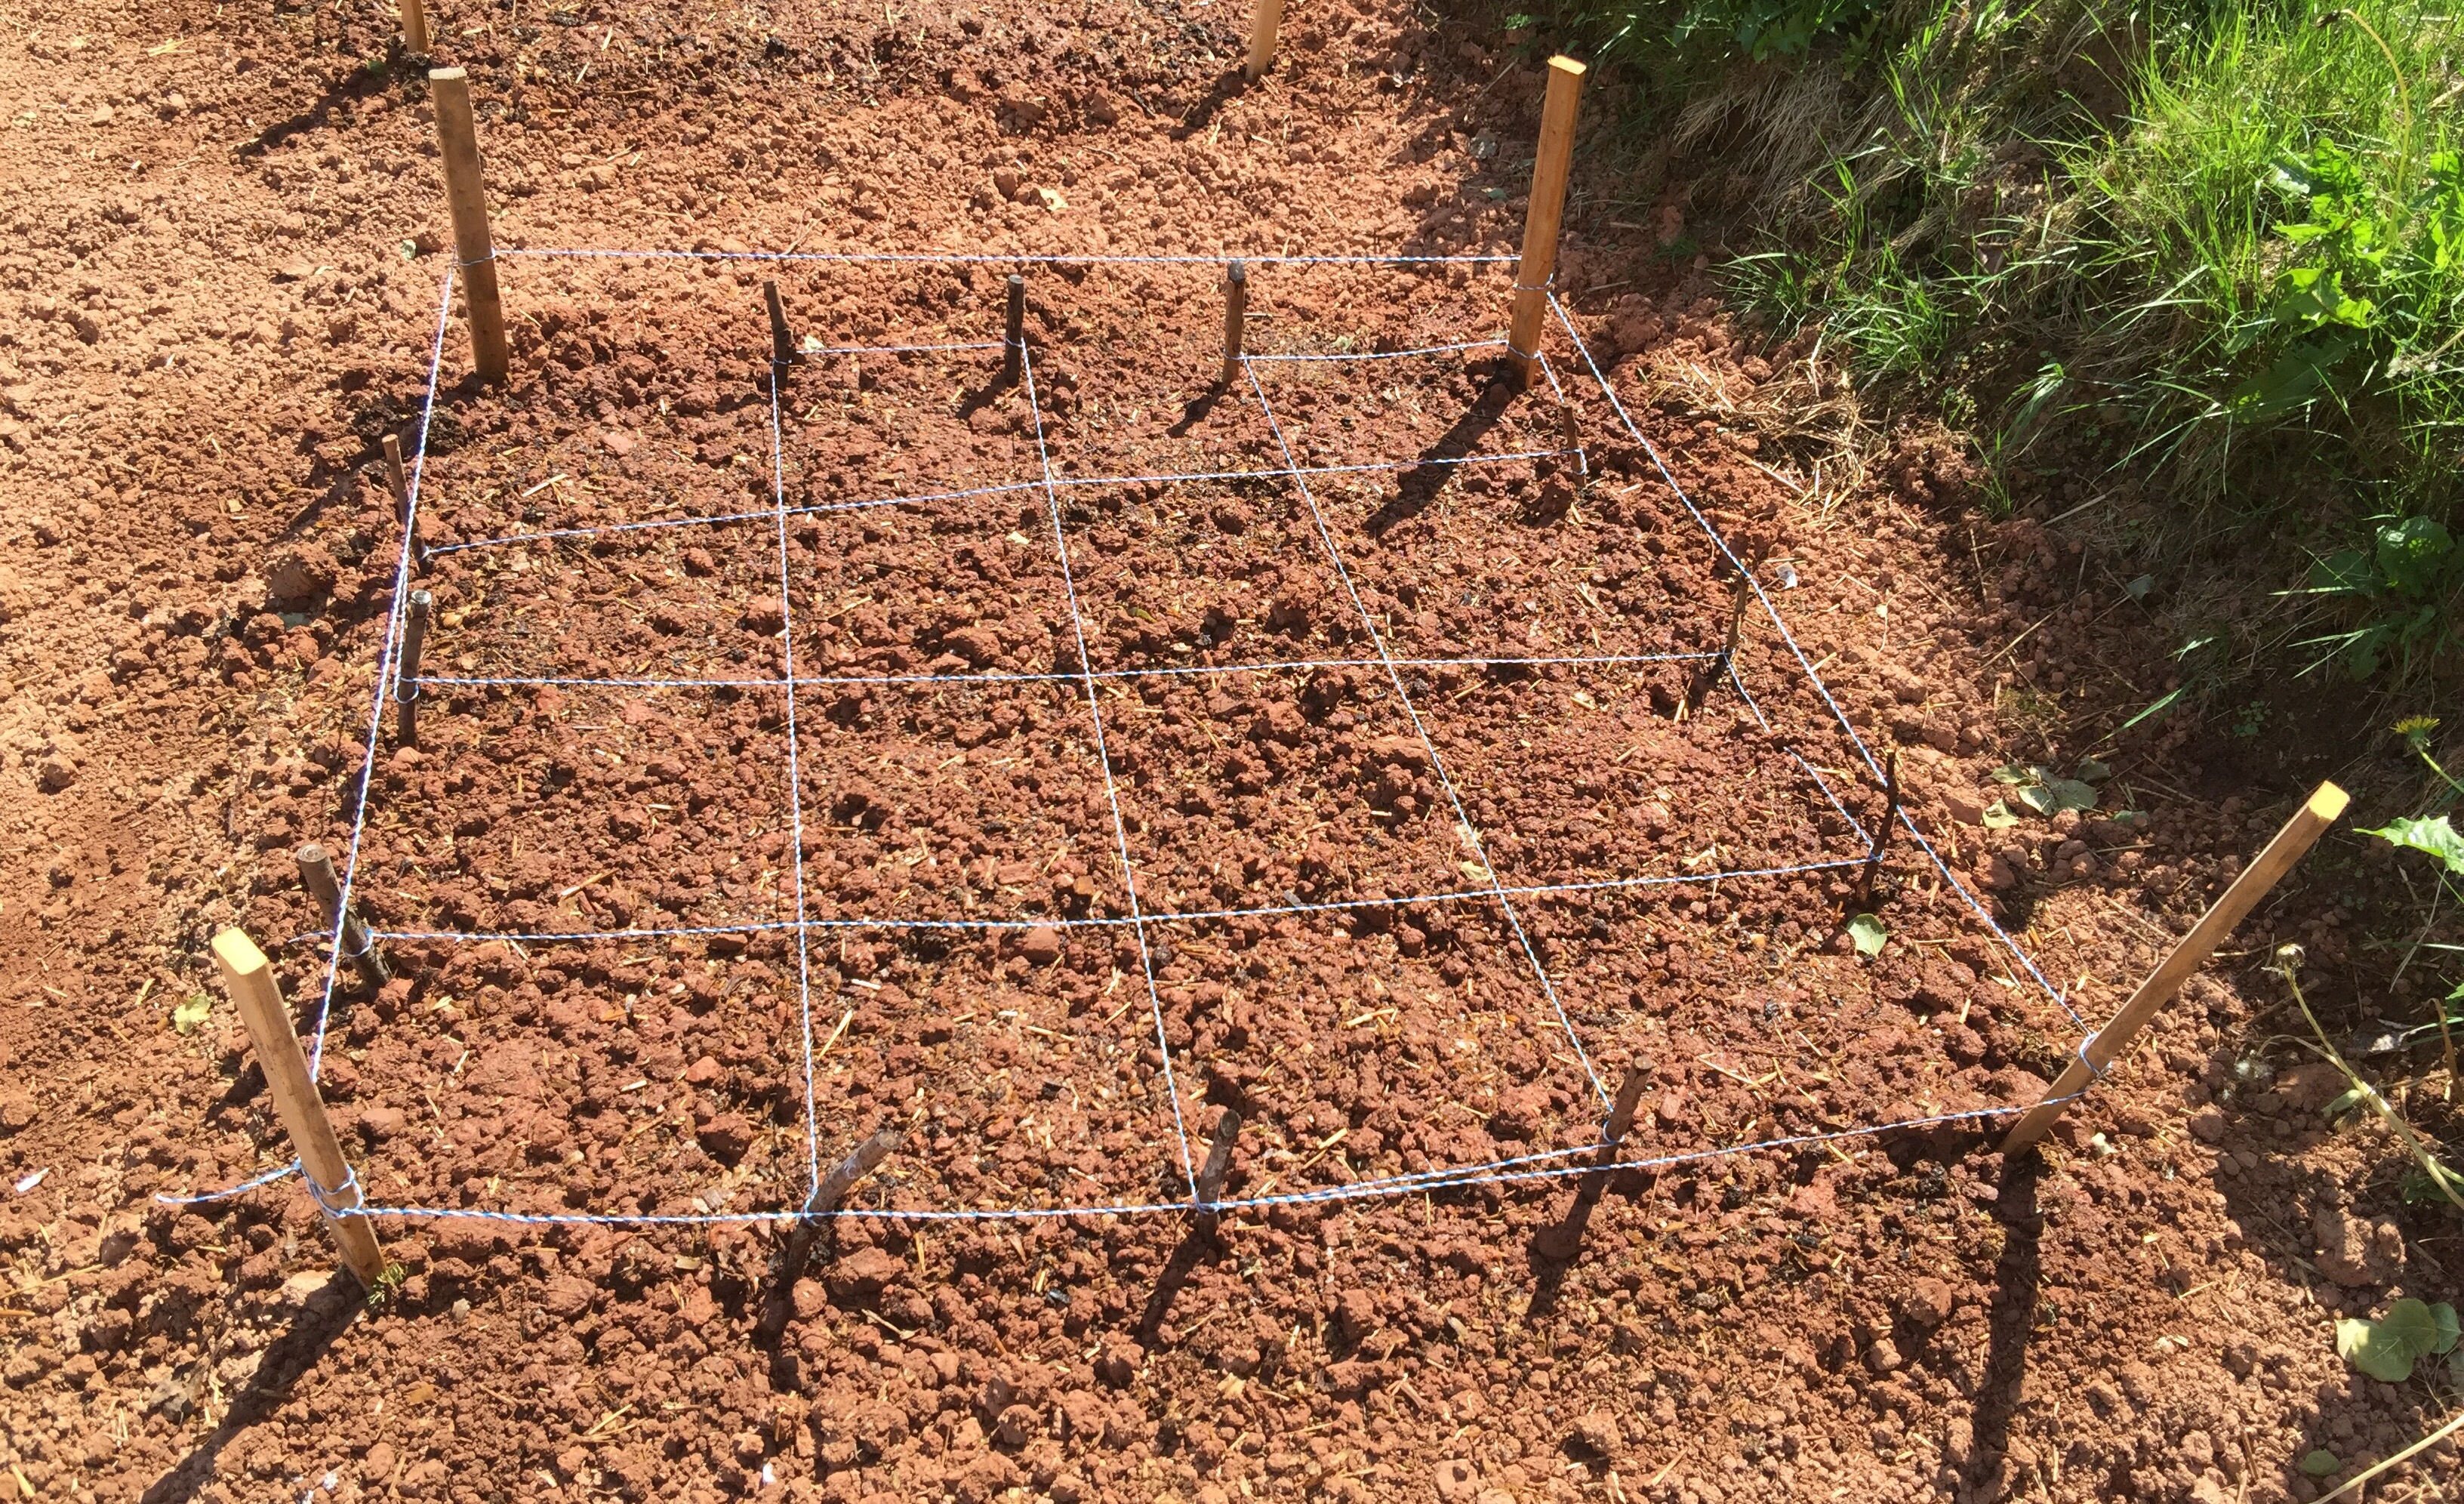
I then measured out 4 foot by 4 foot plots with 3 feet between, and allowing a boarder around the garden itself. I then put a wooden stake in each corner of each plot and used twine to outline each plot.
Next my husband shoveled on well rotted chicken manure from our laying hens onto each plot. It is supposed to do wonders for your garden. And it was racked into the soil.
Next I took a wood stake to ruffly draw out the 16 square feet. Now depending on what you are planting, depends how much you plant in each square. Here is what guide I used:
Potatoes – 1
Tomatoes – 1
Beans – 5
Peas – 8
Carrots – 16
Peppers – 1
Beets – 9
Zucchini – 2
Pumpkins – 1
Melons – 1
Cucumbers – 1
Broccoli – 1
Lettuce – 16
Herbs – 16
I drew out my garden space with the plots and walk paths between. I ended up with 24 plots. I figured what I was planting, and decided what I would plant in each plot. Here is my plan (good or bad, time will tell).

Now we had so much rain that my garden was delayed (again) this year getting planted. I am all done except for transplanting the seedlings I started inside. Those will be planted in garden in the next week or so.
Once all planted, we will be using straw as mulch between the rows again. It worked well last year.
Once everything is up and established, I will post an update.

* In first picture, books I got from local library. Square Foot Gardening, by Mel Bartholornew. Grow All You Can Eat in 3 Square Foot, DK Publishing.


Well summer is just around the corner, and with that comes the new growing season. But before I get started, I thought I would post a recap from last year.
With last year being my first year planting a full garden and in a new part of the country … it went fairly well. Had some difficulties, but also learned at least a few things from those mistakes.

The Spring of 2015 was very late, with 18 feet of snow on the Island it took a LONG time to get it all to melt! Then the ground had to warm up. Needless to say it took a while before we could even prepare our new garden plot. Starting from scratch, removing some bushes, removing sod, tilling it, removing rocks. Whew, I’m tired just thinking about it! Oh and did I mention the black flies apparently love to eat me!! All I can say is, suit up, bug spray, gloves and netting hat saved me.
I had decided to go with all Heritage/Heirloom seeds. Which I don’t think was a bad idea, just they did not grow as well as I hoped, and some not at all. There was some contributing factors that may have affected things, such as poor soil condition (heavy clay), temperature of soil, weather conditions. There were some winners though, and would grow again.

Opalka Tomatoes – a sauce or paste tomato. Though the plants looked fragile to start with they grew and produced the best yielding tomatoes. Did not have any problems with any rot or other disease.
Russian Mamoth Sunflower – they got to around 10 feet tall, full heads, very impressive. Though the sunflower seeds did not quite get to full maturity before the season was done, I think being planted in fuller sun, south exposure would have solved this issue.
Squash (Zucchini) – grew like crazy, and had a long production period. Generally these type do grow well in most areas.

Irish Cobbler Potatoes – grew well, nice sized potatoes. Was able to get new/baby potatoes fairly early which was great! A bit of scabbing once they got to full size, but not a big deal if just peeling them.
Bull’s Blood Beets – one of my best growers. Came in thick and strong. Tops are edible as a green while young to cook or put in salads. My fault was not thinning them out enough. Lesson learned!
I had also tried growing onions from seed, which did not work out. It took a lot of time and once I transplanted into garden they all died. Maybe I will try again, but not any time soon.

Something we did last year and will be doing again this year is mulching the rows with straw. Really helped keep down the weeds, and will really improve the quality of the soil this year. As our soil is heavy clay it will help lighten it.
So onto this year, some veggies I will be growing again are Bull’s Blood Beets and Irish Cobbler Potatoes. Among many new varieties I will be trying this year (more on this will come in a new post).

We will be improving the soil conditions as well by tilling in the straw we used as mulch last year, and chicken manure (from our hens that has composed down). I figure each year the soil should improve in quality.
I will be trying a few new techniques this year and will try to be better at posting my results as I go along.
So here’s hoping for a great year of growing!!
So in my last blog post I mentioned that I was in the process of opening an Etsy shop for all my hand carved items. It is now open, East Coast Woodenware! Check it out, and share with others. I will be adding more items over the next week.
Click on this link to see:
https://www.etsy.com/shop/EastCoastWoodenware?ref=ss_profile


A month into 2016, where has the time gone? I have been busy these last months, so thought I would give an update while I have a spare moment.
I had my first solo art show at a small local art gallery here in PEI. That kept me busy for most of the Fall and into December getting ready for it. It’s a lot of work!! My show ran from January 5th and will be done February 12th. Though I don’t think I will do another one any time soon, it was a great experience!
Check out a few of my pieces!
“The Root”, is carved out of a spruce root I found in my back woods. The face carved in it is a version of the Green Man, a type of spirit of the forest. Click on picture to zoom and see better detail. Size is 6 foot wide and 4 feet tall.

“Sails”, is a representation of the many ship sails in the Atlantic Ocean. Each piece was hand carved and painted. Medium birch, mounted on canvas, 16″ x 20″.

“Moon Crescents”, birch bark container. Embellished with different colored birch bark in the shape of moon crescents and stitching. Handle is natural spruce root. Size 14″ high, 9″ wide at base.

There are many foxes found on PEI, my love and fascination of them inspired these next pieces.
“Fox”, mixed media (birch bark, acrylics). I used the natural color variations of birch bark to create this collage, accented with acrylics. Matted 8″ x 10″.

“Sleeping Under The Moon”, mixed media (birch bark, acrylics). Again I used the color variations of the bark to create this piece. Matted 8″ x 10″.

“Owl Watching”, mixed media (birch bark, acrylics). Inspired by a Barred Owl my husband got a picture of last winter that was sitting outside our house. Canvas, 16″ x 20″.

Once the opening of my show was completed, I took a few days off, then started on my next endeavor! Opening an Etsy shop!!
So I have been busy carving up a storm, and sorting out all the little details of opening an online shop. Making inventory, buying shipping and packaging supplies, marketing materials, and creating social media accounts (check out my Instagram account https://www.instagram.com/eastcoastwoodenware/). Then there is the whole process of the actual online shop, making it look pretty and having all the information it needs! Needless to say life has been a little crazy!!
I’m just about ready to open, it will be called, East Coast Woodenware. It will mainly be hand carved wooden spoons, from the basic to the more intricately decorated spoons.
So stay tuned for my big announcement in the next few days for my grand opening!!


Well, it’s official, Christmas baking has started! Here’s hoping some actually makes it into the freezer!!
Okay so this is a quick and simple recipe that looks impressive.
Ingredients:
5 cups Unsweetened Coconut
2/3 cup White Sugar
6 Tablespoon White Flour
1/4 teaspoon Salt
4 Egg Whites
1 teaspoon Vanilla (or Almond) Extract
Method:
Heat oven to 325 degrees F. Mix eggs white, sugar, salt, and vanilla. Add flour and mix until smooth. Add coconut and stir until coconut in fully incorporated.
Drop by 1 Tablespoon (I use a cookie scoop) onto a lined cookie sheet. Bake for 20 minutes or until golden brown.

Chocolate:
Now you can leave it at that, but I like them dipped with chocolate. So, if you want to do this step, you will need 3/4 cup of chocolate chips. Melt 1/2 cup in microwave on defrost stirring every 30 seconds until totally melted. Then add 1/4 cup chocolate chips. Stir until totally melted do not heat again (this will temper it). Dip your macaroons in and shake off extra chocolate. Drizzle on top using a fork dipped in chocolate.

Enjoy!


A “Love Spoon”, or “Welsh Love Spoon” is a Celtic tradition.
The carving of Love Spoons dates back to the 17th Century. They can be found throughout Wales, the United Kingdom, and Scandinavian countries such as Norway.

The original meaning behind one of these beautifully hand crafted spoons was to show ones affection. A young man would carve one and then present to a young lady to express his love, and intension to court and/or marry her.

There are many styles and symbols that are carved into Love Spoons, with the most common being a heart. Each spoon was carved to represent their love story.

They are still made and given today as presents for engagements, weddings and anniversaries.

Here is one I recently carved. This is my first one, as I have seen many in carving books and online and wanted to give it a try. I’m pretty happy with how it turned out.

It was carved out of birch wood and is a medium sized spoon (9″ long x 2″ wide). It is finished with a beeswax oil finish.

Just in time for Halloween I have a cute cookie recipe!
Each year my kids always want me to make some yummy treat to send to school for Halloween. This year is no different!
These cookies are cute, easy to make and taste just like brownies … Yummy!!
Recipe (makes 4 dozen):1 cup Butter
2 Eggs
2 cups White Sugar
3 teaspoon Vanilla
1 cup Cocoa
3 cups White Flour
1/2 teaspoon Baking Soda
1/2 teaspoon Baking Powder
Mix dough together. Roll into 1 1/2″ balls. Flatten with glass dipped in sugar. 
Next pinch ears at the top of the head. Flatten out the ears a little and adjust shape of head as needed.

Use candy for the eyes (I used Skittles), and a chocolate chip for the nose. Then take a fork and press on either side of head to make the whiskers.

Bake at 350 degrees Celsius for 12 – 15 minutes.
And that’s it! Enjoy!


So my latest project was to re-vamp an Antique dresser I bought, into a new TV console.
I picked up the dresser for around $30 last fall, with the plans to work on it over the winter, obviously that did not happen!

Before I got to the fun part … painting it, I had to do some prep work. First things first, I gave it a good cleaning inside and out. Then I had to test what kind of paint was on it. A good trick, is to use Acetone-Free nail polish remover on a cotton swab, and rub the paint. If it comes off, it is latex paint, if not, it is oil paint. Why do I need to know this? Well, to know what type of paint I need to paint over it with, and if I need a primer. Lucky for me, it was latex. As there was some of the prior color paint peeking through as well, I tested that one too, to make sure it was latex paint as well. It was!

My next challenge was the wood veneer that was bubbled up on a few spots on the top of the dresser. I was hoping it would be an easy fix. I first tried a hairdryer to heat up the area, with the hopes to re-activate the glue … no good. Next I tried putting a wet cloth over the bubbled area and then used an iron. This was in hopes to re-activate the glue with heat and moisture … no go again. Finally I tried to use some wood glue, squeezing it in, then taking a thin blade and spread the glue under the bubbled area. To make sure the glue set properly, I put some weights on it for 24 hours. Bam, it worked!!

Okay, so now with the prep work done, I finally got to paint! I pondered on the color, but finally decided on Hidden Sea Glass (Behr). I kinda have a thing for sea glass!! After a few coats, it was looking good.

After letting the paint cure for a few days, I decided I loved the color, but felt it was too stark for my style. So I took my sander to it, to give it more of a destressed look to it. Sanding edges and where the handles are gave it more of an aged look to it. The previous paint colors came through (white, mint and raw wood) and it really looks nice!!


Then, I just had a few more finishing touches to complete the project. Getting some shelves installed was next on the list. I decided with everything we needed to put in the TV console, that I would do two open shelves, and then one drawer to hide the odds and ends. I used a laminated pine board for the shelves. I cut them to size (I left a bit of an overhang on the front), then gave them a good sanding and slide them in. That was easy!
For the finishing touch, I added some cool handles that I picked up. Last minute I remembered I had some scented drawer liner, so put that in the bottom of the drawer (I think it looks cute, and smells nice too).

Now, in its new place, and the TV mounted on the wall above it, we are very happy with the final project! It serves its purpose, and looks good doing it!!


There are many Recipes and ways to make wine slushies. For me I like simple and quick! So my recipe is easy with only a few ingredients.
In blender, add:
– 1 cup wine (white or blush)
– 1.5 cups frozen fruit (any kind you like)
– sweetener (to taste)
– juice of a quarter lemon (or lime)
Blend until smooth. Pour into glass, top off with a little soda for a bit of fizz (also gives a creaminess to it). Add a straw, and there you have it. Depending on size of glass, 2-3 servings.

It will melt, so put in fridge or freezer what is left in blender. You can make bigger batches, but I prefer to make smaller batches, it blends better, and you don’t have to worry about it melting.

Cheers and enjoy on a hot summer day! You can even share if you are feeling so generous!!
